Application Deployment: Citrix Receiver

Deploying the Citrix Receiver has been an ongoing challenge; if you deploy it while the user is logged in chances are you’ll kill a VDI or published app that is running and disrupt the user. Conversely if you deploy only when the user is not logged in you’re penetration of the new client is going to be slim at best.

As of SCCM CB 1702 you can now specify install behaviour which allows you to specify any executable’s that must not be running before the deployment can run.

For Citrix, when a published app or a VDI is run Wfica32.exe is called and runs for the duration of the use of the application or the VDI. So by specifying this in the install behaviour you allow you’re deployment to run as required without impacting the users active sessions. 2017-11-16_9-22-08

The second piece to this is in the deployment where you are able to specify whether to automatically these executable’s if they are running. For Citrix I opt not to do this because it’s more about the user experience.

2017-11-16_9-32-25

Where the deployment runs and Citrix is being used the user will be presented with the below prompt, keep in mind the deployment will fail but it will re-run as per your Software Deployment re-evaluation under client settings.

2017-11-16_9-44-34


For more information see – https://docs.microsoft.com/en-us/sccm/apps/deploy-use/deploy-applications

SCCM Report: Asset Overview

One of the first things people want to start seeing once they have SCCM in place is richer detail on all of the devices that are being managed. I’ve written this report to provide an overview of all devices.

One key thing to call out is the way I structure reports like this is based around creating a temp table and then joining multiple queries together through the ‘UPDATE’ statement, this allows you to on the fly manage multiple values on sub queries to ensure you’re getting the desired data.

Capture.PNG

 DECLARE @TempTable TABLE(
Hostname varchar (100),
CCMClient varchar (10),
OperatingSystem varchar (100),
Manufacturer varchar (100),
Model varchar (100),
Chassis varchar (100),
Serial varchar (100),
IsVirtual varchar (100),
CPU ntext,
CPUCores int,
CPULogical int,
RAM int,
VolumeSize_C int,
VolumeFree_C int
)

INSERT INTO @TempTable (Hostname, OperatingSystem,CCMClient, IsVirtual)

SELECT
dbo.v_R_System.Name0,
dbo.v_R_System.operatingSystem0,
CASE WHEN dbo.v_R_System.Client0=1 THEN 'Yes' ELSE 'No' END,
CASE WHEN dbo.v_R_System.Is_Virtual_Machine0=1 THEN 'Yes' ELSE 'No' END
FROM
dbo.v_R_System

UPDATE @TempTable
SET Manufacturer = (
SELECT DISTINCT
dbo.v_GS_COMPUTER_SYSTEM.Manufacturer0
FROM
dbo.v_GS_COMPUTER_SYSTEM
INNER JOIN dbo.v_R_System ON dbo.v_GS_COMPUTER_SYSTEM.ResourceID = dbo.v_R_System.ResourceID
WHERE
(dbo.v_R_System.Name0 = HostName) AND
(dbo.v_GS_COMPUTER_SYSTEM.Manufacturer0 IS NOT NULL)
)

UPDATE @TempTable
SET Model = (
SELECT DISTINCT
dbo.v_GS_COMPUTER_SYSTEM.Model0
FROM
dbo.v_GS_COMPUTER_SYSTEM
INNER JOIN dbo.v_R_System ON dbo.v_GS_COMPUTER_SYSTEM.ResourceID = dbo.v_R_System.ResourceID
WHERE
(dbo.v_R_System.Name0 = HostName) AND
(dbo.v_GS_COMPUTER_SYSTEM.Model0 IS NOT NULL)
)

UPDATE @TempTable
SET Chassis = (
SELECT DISTINCT
CASE dbo.v_GS_SYSTEM_ENCLOSURE.ChassisTypes0
WHEN '1' THEN 'Other'
WHEN '2' THEN 'Unknown'
WHEN '3' THEN 'Desktop'
WHEN '4' THEN 'Low Profile Desktop'
WHEN '5' THEN 'Pizza Box'
WHEN '6' THEN 'Mini Tower'
WHEN '7' THEN 'Tower'
WHEN '8' THEN 'Portable'
WHEN '9' THEN 'Laptop'
WHEN '10' THEN 'Notebook'
WHEN '11' THEN 'Hand Held'
WHEN '12' THEN 'Docking Station'
WHEN '13' THEN 'All in One'
WHEN '14' THEN 'Sub Notebook'
WHEN '15' THEN 'Space-Saving'
WHEN '16' THEN 'Lunch Box'
WHEN '17' THEN 'Main System Chassis'
WHEN '18' THEN 'Expansion Chassis'
WHEN '19' THEN 'SubChassis'
WHEN '20' THEN 'Bus Expansion Chassis'
WHEN '21' THEN 'Peripheral Chassis'
WHEN '22' THEN 'Storage Chassis'
WHEN '23' THEN 'Rack Mount Chassis'
WHEN '24' THEN 'Sealed-Case PC'
ELSE 'Undefinded' END AS 'Chassis'
FROM
dbo.v_R_System
INNER JOIN dbo.v_GS_SYSTEM_ENCLOSURE ON dbo.v_R_System.ResourceID = dbo.v_GS_SYSTEM_ENCLOSURE.ResourceID
WHERE
(dbo.v_R_System.Name0 = HostName) AND
(dbo.v_GS_SYSTEM_ENCLOSURE.ChassisTypes0!='12')
)

UPDATE @TempTable
SET Serial = (
SELECT DISTINCT
dbo.v_GS_PC_BIOS.SerialNumber0
FROM
dbo.v_GS_PC_BIOS
INNER JOIN dbo.v_R_System ON dbo.v_GS_PC_BIOS.ResourceID = dbo.v_R_System.ResourceID
WHERE
(dbo.v_R_System.Name0 = HostName) AND
(dbo.v_GS_PC_BIOS.SerialNumber0 IS NOT NULL)
)

UPDATE @TempTable
SET CPU = (
SELECT DISTINCT
dbo.v_GS_PROCESSOR.Name0
FROM
dbo.v_GS_PROCESSOR
INNER JOIN dbo.v_R_System ON dbo.v_GS_PROCESSOR.ResourceID = dbo.v_R_System.ResourceID
WHERE
(dbo.v_R_System.Name0 = HostName) AND
(dbo.v_GS_PROCESSOR.Name0 IS NOT NULL)
)

UPDATE @TempTable
SET CPUCores = (
SELECT DISTINCT
dbo.v_GS_PROCESSOR.NumberOfCores0
FROM
dbo.v_GS_PROCESSOR
INNER JOIN dbo.v_R_System ON dbo.v_GS_PROCESSOR.ResourceID = dbo.v_R_System.ResourceID
WHERE
(dbo.v_R_System.Name0 = HostName) AND
(dbo.v_GS_PROCESSOR.NumberOfCores0 IS NOT NULL)
)

UPDATE @TempTable
SET CPULogical = (
SELECT DISTINCT
dbo.v_GS_PROCESSOR.NumberOfLogicalProcessors0
FROM
dbo.v_GS_PROCESSOR
INNER JOIN dbo.v_R_System ON dbo.v_GS_PROCESSOR.ResourceID = dbo.v_R_System.ResourceID
WHERE
(dbo.v_R_System.Name0 = HostName) AND
(dbo.v_GS_PROCESSOR.NumberOfLogicalProcessors0 IS NOT NULL)
)

Update @TempTable
SET VolumeSize_C = (
SELECT TOP (1)
dbo.v_GS_LOGICAL_DISK.Size0
FROM
dbo.v_GS_LOGICAL_DISK
INNER JOIN dbo.v_R_System ON dbo.v_GS_LOGICAL_DISK.ResourceID = dbo.v_R_System.ResourceID
WHERE
(dbo.v_GS_LOGICAL_DISK.Size0 IS NOT NULL) AND
(dbo.v_GS_LOGICAL_DISK.DeviceID0 = N'C:') AND
(dbo.v_R_System.Name0 = HostName)
)

Update @TempTable
SET VolumeFree_C = (
SELECT TOP (1)
dbo.v_GS_LOGICAL_DISK.FreeSpace0
FROM
dbo.v_GS_LOGICAL_DISK
INNER JOIN dbo.v_R_System ON dbo.v_GS_LOGICAL_DISK.ResourceID = dbo.v_R_System.ResourceID
WHERE
(dbo.v_GS_LOGICAL_DISK.DeviceID0 = N'C:') AND
(dbo.v_R_System.Name0 = HostName)
)

Update @TempTable
SET RAM = (
SELECT
SUM(dbo.v_GS_PHYSICAL_MEMORY.Capacity0)/1024
FROM
dbo.v_GS_PHYSICAL_MEMORY
INNER JOIN dbo.v_R_System ON dbo.v_GS_PHYSICAL_MEMORY.ResourceID = dbo.v_R_System.ResourceID
WHERE
(dbo.v_R_System.Name0 = HostName)
)

SELECT *
FROM
@TempTable

ORDER BY
Hostname

Or you can download the .rdo here and install. One note using this report you must have the OperatingSystem attribute being discovered by AD System Discovery.

If you have questions or want to see extra detail in these reports feel free to comment below and I can assist in extending.

Part 16: Reporting Services

Reporting Services are essential for getting data out of SCCM, this provides operational insights and assists in supporting and managing the platform.

  1. Install SQL Reporting Services feature – We already compeleted this in PART 4: INSTALLING SQL 2016.
  2. Open Reporting Services Configuration Manager – Start > All Programs Microsoft SQL Server 2016 > Reporting Services Configuration Manager
  3. Click Connect
    2017-09-25_17-13-40.png
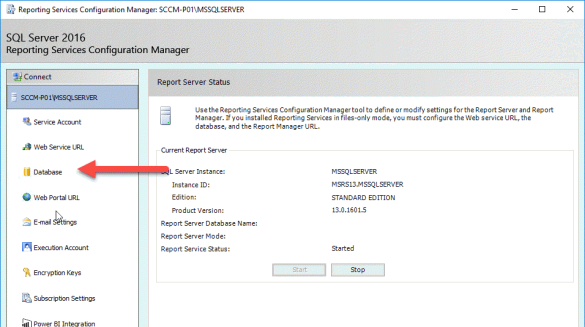
  4. Click database
    2017-09-25_17-15-30.png
  5. Click change database
    2017-09-25_17-17-55.png
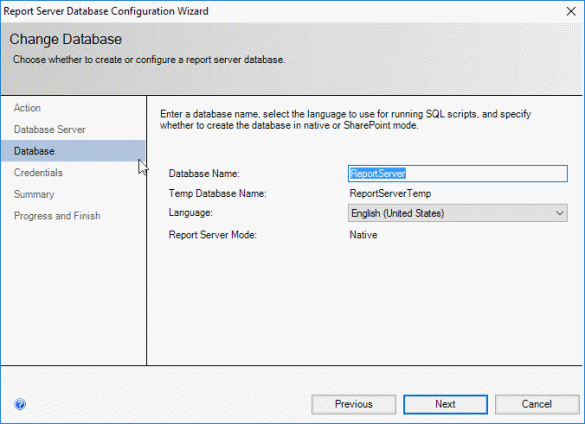
  6. Select ‘create a new report server database’
    2017-09-25_17-19-18.png
  7. Test Connection and click next
    2017-09-25_17-22-28.png
  8. Click Next
    2017-09-25_17-23-42.png
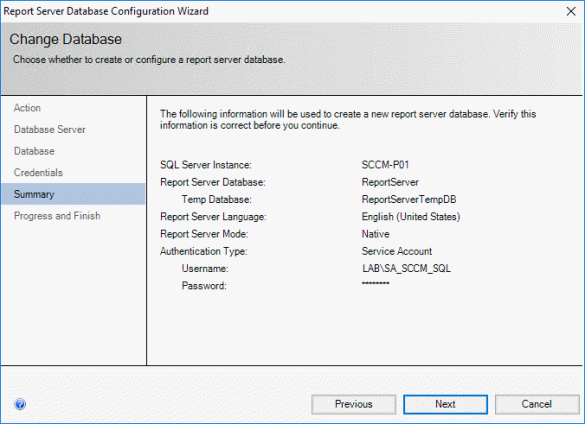
  9. Click Next
    2017-09-25_17-24-25.png
  10. Click Next
    2017-09-25_17-25-11.png
  11. Confirm successful
    2017-09-25_17-26-34.png
  12. Select Web Service URL and click apply
    2017-09-25_17-32-11.png
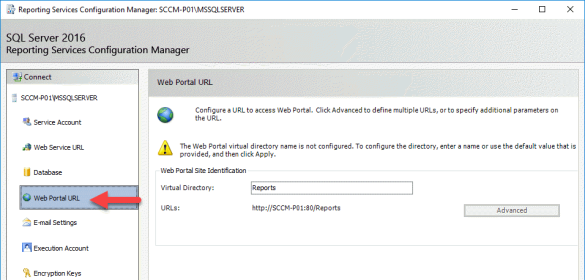
  13. Select Web Portal URL and click apply
    2017-09-25_17-34-01
  14. Open SCCM Console
  15. Browse to Administration > Sites Configuration > Servers and Site System Roles
  16. Select Add Site System role
  17. Click Next
    2017-09-25_17-43-57.png
  18. Click Next
    2017-09-25_17-44-40.png
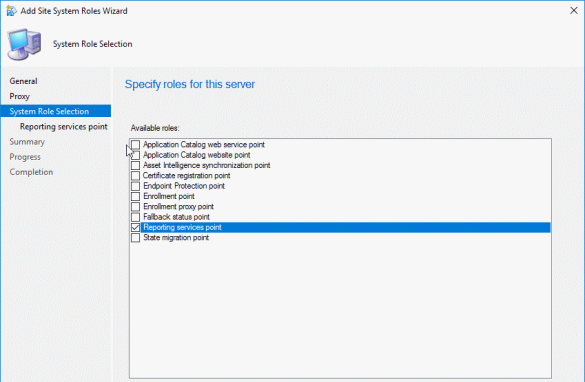
  19. Select Reporting Service point and click next
    2017-09-25_17-45-09.png
  20. Click ‘Verify’ and set your reporting services account.
    2017-09-25_17-48-29.png
  21. Click Next
  22. Confirm successful
    2017-09-25_17-49-40.png
  23. After about 5 minutes you should start seeing reports populated under Monitoring > Reports.
    2017-09-25_17-55-42.png

Part 9: Boundaries & Boundary Groups

Boundaries have got to be one of the most overlooked and difficult to grasp concepts in ConfigMgr. While not overly complex a lot of people don’t really understand how they work, particularly IP Subnets which are unfortunately not an accurate representation of what they are.

What are they

The short answer is a boundary is a network location that a client can identify as being on. These are in turn grouped together so that resources like Distribution Points and site systems can be associated with them.

Why you need them

Without boundaries clients don’t know where to go to get content or what site they should connect to (only if you have multiple sites in your environment). When you configure a boundary, lets call it Boundary A and associate it with Boundary Group ‘Sydney’, Clients that identify as being on Boundary ‘A’ will go to the Distribution Point associated with Boundary group ‘Sydney’.

It’s critical for networks that boundaries be configured so that content distribution can be managed in a way that does not saturate WAN links. This can be particularly a problem for links that are small like 2Mb.

Types

  • IP Subnet – This is a bit of a misnomer, these boundaries are actually subnet ID’s NOT subnets. There is quite a bit of confusion around how these work, suffice it to say that you want to only use /24 subnets when using this type of boundary.
  • Active Directory Site – Imported directly from AD Sites and Services. Requires Forest discovery to be configured.
  • IPv6 Prefix – Like IP Subnets but for IPv6.
  • IP Address Range – Explicit range of IP addresses. Not recommended to be used due to the high SQL performance impact.

Bulk creation

Kaido Järvemets has written an excellent script for completing this, for all the details check it out here.

[Threading.Thread]::CurrentThread.CurrentCulture = 'en-US'
$XLSX = New-Object -ComObject "Excel.Application"

$BoundariesXLSXFile = "C:\Users\Administrator\Desktop\CM_Boundaries.xlsx"
$Path = (Resolve-Path $BoundariesXLSXFile).Path
$SavePath = $Path -replace ".xl\w*$",".csv"

$WorkBook = $XLSX.Workbooks.Open($Path)
$WorkBook.SaveAs($SavePath,6)
$WorkBook.Close($False)
$XLSX.Quit()

$Boundaries = Import-Csv $SavePath

foreach($Item in $Boundaries)
{
Switch($item.'Boundary Type')
{

"IP Subnet" {$Type = 0}
"Active Directory Site" {$Type = 1}
"IPv6" {$Type = 2}
"Ip Address Range" {$Type = 3}

}

$Arguments = @{DisplayName = $Item.'Display Name'; BoundaryType = $Type; Value = $Item.Value}

Set-WmiInstance -Namespace "Root\SMS\Site_PRI" -Class SMS_Boundary -Arguments $Arguments -ComputerName Server100
}

My Recommendation

There’s much to be said about using IP Subnets and how they’re evil. My experience is that if you’ve got them defined and you’re only using /24 addresses then you’ll be fine. Where this is not the case leverage IP Ranges.

Further reading:
ConfigMngrFTW – IP Subnet Boundaries Are Still Evil
TechNet – Planning for Boundaries and Boundary Groups in Configuration Manager

Part 8: Discovery Methods

SCCM has a number of discovery methods which it uses to populate SCCM with resource records. You need these so you can do good stuff like deploy apps, operating systems, software updates, compliance and do reporting. If you choose not to enable these you’ll have a very empty ConfigMgr environment.

  • Active Directory Forest Discovery
    • What: Discovers subnets via sites and services and forests/domains for publishing SCCM
    • Why: Required for SCCM to be published to the forest/domain. Also allows boundaries to automatically be created based on sites and services.
    • Best Practice: Enabled but without auto boundary creation (unless you have immaculate AD sites and services).
  • Active Directory Group discovery
    • What: Discover all AD groups and their members
    • Why: Essential for deploying things to AD groups and also reporting.
    • Best Practice: Enable it!
  • Active Directory System Discovery
    • What: Scans AD for all computer objects
    • Why: Essential for identifying all computers in the organisation before the client has been deployed.
    • Best Practice: Enable it!
  • Active Directory User Discovery
    • What: Scans AD for all user account objects
    • Why: Like computers chances are you’ll want to deploy or advertise software to users.
    • Best Practice: Enable it!
  • Heartbeat Discovery
    • What: Unlike other discovery heartbeat is all about the client sending a packet of info to the primary site server
    • Why: Provides health, client details, network location etc.
    • Best Practice: Don’t turn this off it’s required
  • Network Discovery
    • What: Queries DHCP, ARP Tables on Routers, SNMP and AD
    • Why:  May be useful if you need to discover workgroup compouters
    • Best Practice: Don’t use unless required, my experience has been that turning this on pollutes your DB.

Continue reading

Part 7: Software Update Point & SCUP (With HTTPS)

If you’re looking to manage patches with SCCM, and lets face it why wouldn’t you be, then you’ll need to install the software update point role. In this post we’ll install and configure everything you need to get started including the System Center Update Publisher which allows you to deploy non Microsoft updates via SCCM.

In Part 3: Prep & Pre-reqs we installed WSUS, lets get to configuring everything.

Continue reading

Part 6: Upgrading SCCM Current Branch

Now that you have ConfigMgr setup it’s time to upgrade it to the latest version. This is a relatively straight forward process and applies to all versions of current branch from 1511 onward. In the last post I installed 1606 so that’s what we’ll be using.

NB: You must have the Service Connection point installed and configured to upgrade.

At a glance:

  1. Confirm no operational issues with SCCM sites
  2. Review new SCCM version requirements, 1702 for example removes support for 2008 server. So you will need to upgrade these sites to 2012 or 2016 before upgrading.
  3. Patch, patch, patch!
  4. Uninstall any deprecated SCCM Sites system roles before upgrading
  5. Disable DB replicas on all primary sites (if you’re using them)
  6. Disable maintenance tasks
  7. Run Pre-req check for update
  8. Backup DBs (CAS and Primary)
  9. Test DB Backups
  10. Backup any custom .mof files
  11. Restart all Site Systems
  12. Upgrade
  13. Deploy new SCCM Admin Console
  14. Reconfigure DB Replicas
  15. Upgrade Clients
  16. Reconfigure clients

Continue reading

Part 5: Installing SCCM 1606

So far in the series we’ve run up all the infrastructure required and configured all prerequisites for SCCM. So lets set that up now….

  1. Download SCCM 1606 here.
  2. Run pre-req check tool –  M:\SMSSETUP\BIN\X64\Prereqchk.exe /AdminUI
    2017-04-25_19-41-01.png
  3. Run splash.hta
  4. Click Install
    2017-04-25_19-42-38
  5. Click Next
    2017-04-25_19-44-08
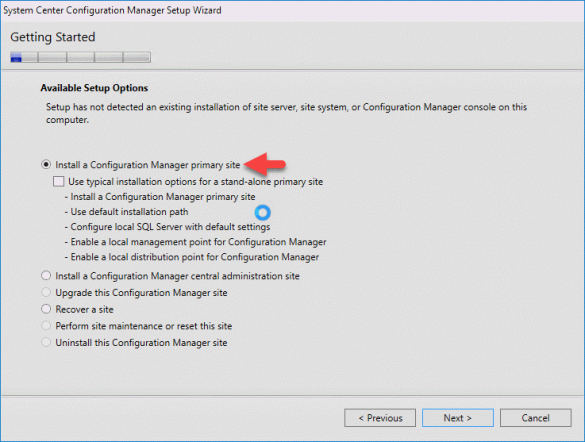
  6. Select Install a Configuration Manager Primary Site and click next.
    2017-04-25_19-45-26.png
  7. Enter a serial key if you have one otherwise select eval.
    2017-04-25_19-47-27.png
  8. Accept the terms and click next
    2017-04-25_19-50-35.png
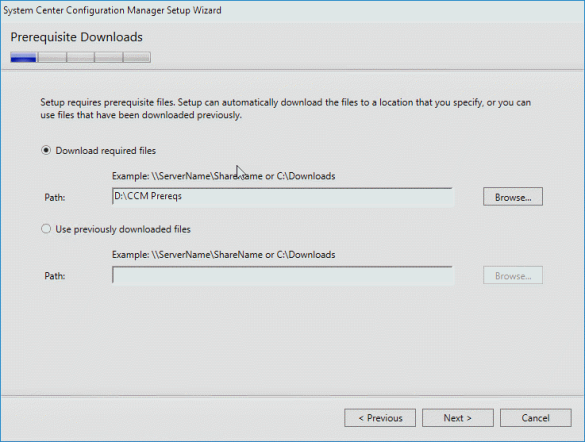
  9. Select a download location and click next
    2017-04-25_19-52-12
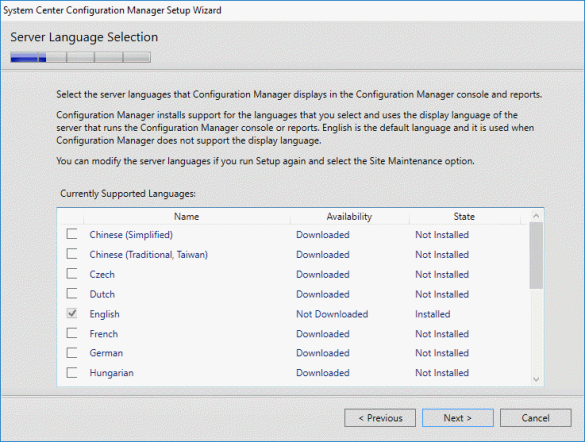
  10. Select language and click next
    2017-04-25_20-10-48.png
  11. Select supported languages and click next, i like to check support for all languages on mobile devices.
    2017-04-25_20-11-30.png
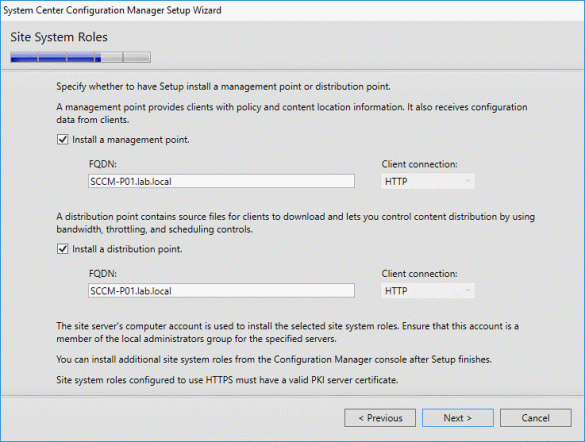
  12. Set site code, site name an installation folder which should be the SCCM volume you created earlier.
    1. Site Code – P01
    2. Site name – Primary site 1
    3. Installation folder – D:\Program Files…..
      2017-04-25_20-13-42.png
  13. As this is the first primary site select install standalone primary site
    2017-04-25_20-15-59.png
  14. Define SQL server details, my SQL instance is local.
    2017-04-25_20-17-12.png
  15. Confirm locations are correct and click next
    2017-04-25_20-18-14.png
  16. Specify the FQDN and click next
    2017-04-25_20-19-12.png
  17. Select configure manually, we’ll setup HTTPS communication later.
    2017-04-25_20-20-48.png
  18. Specify server name and click next.
    2017-04-25_20-22-26.png
  19. Review usage data and click next
    2017-04-25_20-23-28.png
  20. Check install service connector and click next
    2017-04-25_20-24-26.png
  21. Review install summary and click next
    2017-04-25_20-25-44.png
  22. Confirm all pre-reqs have been met and click Begin install
    2017-04-25_20-33-17.png
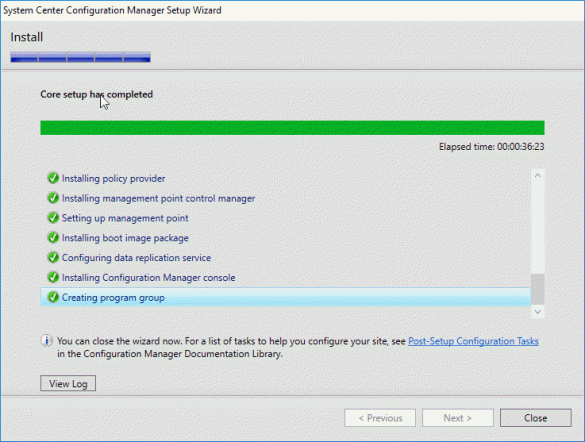
  23. Confirm all features installed successfully
    2017-04-25_21-11-23.png
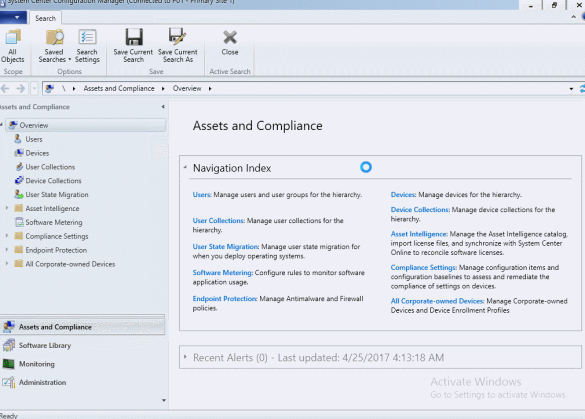
  24. You’re done for now!
    2017-04-25_21-13-44.png


Part 3: Prep & Pre-reqs

In this post I’m going to setup all the prerequisites for SCCM and SQL. I’ll cover off on the install of SQL and configMgr in following articles though.

  1. Create a new Virtual Machine with the below
    • Name: SCCM-P01
    • Generation: 2
    • Startup Memory: 1024
    • Use Dynamic memory for this VM: Yes
    • Connection: vNet External
  2. I’ve allocated 8vCPUs to my SCCM VM.
  3. Add the following disks to the VM:
    • D:\ – SCCM (200GB)
    • E:\ – SQL Databases (50GB)
    • F:\ – SQL TempDB (50GB)
    • G:\ – SQL Logs (50GB)
  4. Install Windows Server 2016 Standard
  5. Set a static IP address, mines 192.168.0.110
  6. Give your server a name, mines SCCM-P01
  7. Join the lab domain
  8. Initialize all of the extra Hard Drives and format the SQL volumes with 64K allocation unit size
  9. Create the following Service Accounts
    • SA_SCCM_SQL
    • SA_SCCM_SQLReporting
    • SA_SCCM_NetworkAccess
    • SA_SCCM_Client
    • SA_SCCM_DomainJoin
  10. Create the following groups in AD
    • SCCM Server Admins
    • SCCM Servers
  11. Add your server to the newly created AD group ‘SCCM Servers’
  12. Delegate Full Control to the SYSTEM Container in Active Directory for the group ‘SCCM Servers’.
  13. Create a GPO for your SCCM server, mines in lab.local\Member Servers\SCCM
  14. Create the following Inbound Firewall rules in the GPO, Computer Configuration>Policies>Windows Settings>Security Settings> Windows Firewall with Advanced Security>Inbound.
    • Port (TCP) – 1433
    • Port (TCP) – 1434
    • Port (TCP) – 4022
    • Port (TCP) – 135
    • Port (TCP) – 2383
    • Port (TCP) – 2382
    • Port (TCP) – 80
    • Port (TCP) – 443
    • Port (TCP) – 1434
  15. Create a new file in sysvol called ‘No_sms_on_drive.sms’ and copy the file using GP Preferences to C:\ with the SCCM GPO.
  16. Extend AD Schema on DC01
    1. Login with an account with Schema Admins rights.
    2. Mount ConfigMgr ISO on
    3. Open PoerWhell as an adminstrator and run  .\SMSSETUP\BIN\X64\extadsch.exe
      2017-03-28_14-32-32.png
    4. Open log C:\Extadsch.log and confirm the schema has been successfully extended.
      2017-03-28_14-34-13.png
  17. Create System Management Container.
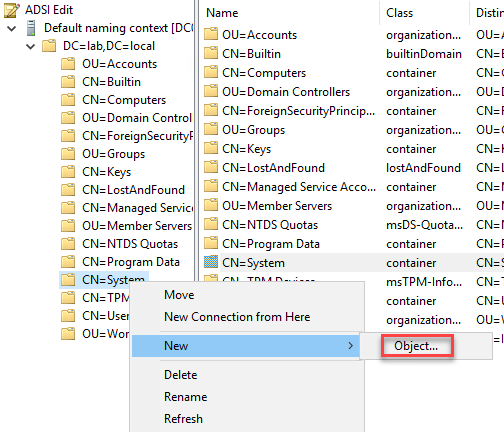
    1. Open ADSI Edit
    2. Right Click System container>New>Object
      2017-03-28_14-37-30.png
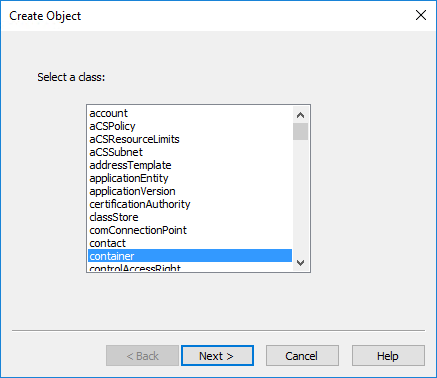
    3. Select Container and click Next.
      2017-03-28_14-38-18.png
    4. Enter ‘System Management’ exactly and click next.
      2017-03-28_14-39-31.png
    5. Right click on System Management Container and select Properties and then select the Security tab.
    6. Add your Primary SCCM Server and delgate full control.
      2017-03-28_14-46-01.png
    7. Click Advanced
    8. Select the site server and click Edit.
      2017-03-28_14-48-24.png
    9. Under applies to select This object and all descendant objects.
      2017-03-28_14-49-36.png
  18. On you SCCM Primary Site Server open PowerShell and run the following commands to install the prerequisite roles and features.
    Install-WindowsFeature Web-Windows-Auth
    Install-WindowsFeature Web-ISAPI-Ext
    Install-WindowsFeature Web-Metabase
    Install-WindowsFeature Web-WMI
    Install-WindowsFeature BITS
    Install-WindowsFeature RDC
    Install-WindowsFeature NET-Framework-Features -source \\yournetwork\yourshare\sxs
    Install-WindowsFeature Web-Asp-Net
    Install-WindowsFeature Web-Asp-Net45
    Install-WindowsFeature NET-HTTP-Activation
    Install-WindowsFeature NET-Non-HTTP-Activ

    2017-03-28_15-29-10.png

  19. Install Windows Update Service
  20. Install Windows ADK
    1. Download ADK from here
    2. Run ADKsetup.exe
    3. Change installation directory to your SCCM volume and click next.
      2017-04-23_20-05-29.png
    4. Select the below features and click Install.
      2017-04-23_20-07-33.png
    5. Once completed restart your server.

Part 2: Certificate Authority (Server 2016)

Next step is to run up a CA this is optional, some reasons why you might want a CA for SCCM:

  • HTTPS – You need all SCCM communication to be encrypted
  • TDE – You need to encrypt your databases, MBAM for example
  • MDM – You want mobile devices to use certificates to authenticate instead of requiring credentials for company resources like mail and Wi-Fi.

In my lab I’m going to implement a two tier Certificate Authority, an Offline RootCA and a subordinate CA which will be co-hosted on my primary Domain Controller (DC01). For some more details on planning production CA architecture see Securing PKI: Planning a CA Hierarchy.

  1. Create a new Virtual Machine with the below config:
    Name: RootCA
    Generation: 2
    Startup Memory: 1024
    Use Dynamic memory for this VM: Yes
    Connection: vNet External
  2. Install Windows Server 2016 Standard
    Note: This server MUST NOT be joined to your domain.
  3. Set a static IP address, mines 192.168.0.250
  1. Give your server a name, mines RootCA.
  2. In Server Manger click Manage> Add roles and Features
  3. Under Server Roles tick Active Directory Certificate Services and click Next.
    2017-03-20_16-53-19.png
  4. Click Next until you get to Role Services.
  5. Select Certificate authority and click Next.
    2017-03-20_16-56-08.png
  6. Click Install
  7. Under Server Manager click the flag> Configure Active Directory Certificate Services.
    2017-03-20_16-58-01
  8. Make sure you’re using the administrator account.
    2017-03-20_16-59-11.png
  9. Select Certificate Authority and click Next.
    2017-03-20_17-00-17.png
  10. Select Standalone CA and click Next.
    2017-03-20_17-01-15.png
  11. Select RootCA and click Next.
    2017-03-20_17-02-21
  12. Select create a new private key and click next.
    2017-03-20_17-03-19
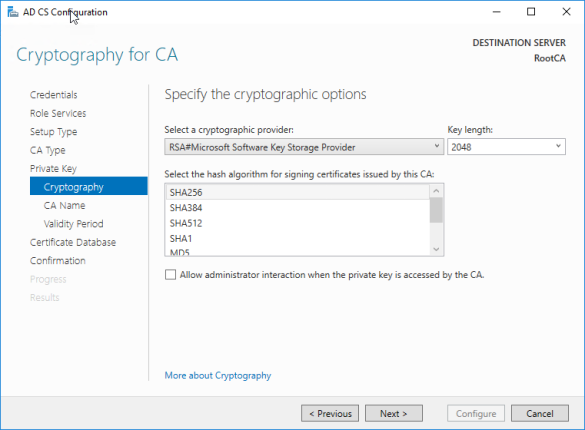
  13. Leave the default cryptography and click next. You’ll be fine as long as it’s not SHA-1
    2017-03-20_17-04-30.png
  14. Change the common name, i’m using RootCA and click next.
    2017-03-20_17-06-26.png
  15. Increase validity period to 20 years and click next.
    2017-03-20_17-07-13
  16. Leave the certificate database in the default location and click next.
  17. Click Configure
  18. Confirm configuration successful.
    2017-03-20_17-08-58.png
  19. Open Regedit and increase the REG_DWORD ‘ValidityPeriodUnits’ to ’20’, located here:
    HKEY_LOCAL_MACHINE\SYSTEM\CurrentControlSet\services\CertSvc\Configuration\RootCA\ValidityPeriodUnits
  20. Open PowerShell and run the following commands:
    certutil –setreg caDSConfigDN CN=Configuration,DC=lab,DC=local
    certutil -setreg caDSDomainDN “DC=lab,DC=local”
  21. Launch Certificate Authority from Server Manager
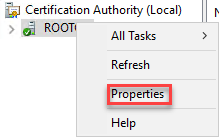
  22. Right Click RootCA>Properties
    2017-03-20_17-20-16.png
  23. Browse to the Extensions tab.
    2017-03-20_18-05-41.png
  24. Add a new CRL Distribution Point extension – http://DC01/CertEnroll/<CaName><CRLNameSuffix><DeltaCRLAllowed>.crl and select the following:
    2017-03-20_18-07-56.png
  25. Select ‘C:\Windows…’ CRL Distribution Point and select Publish CRLs to this location only.
    2017-03-20_18-10-04
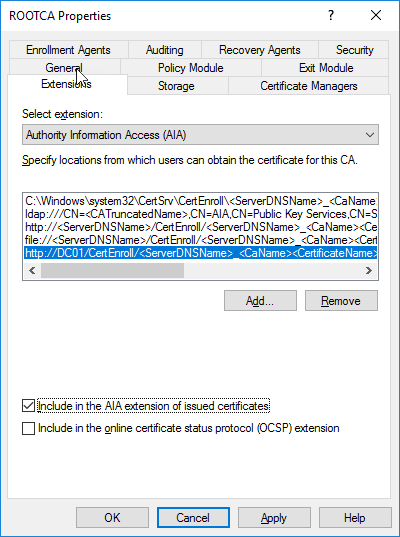
  26. Under Select extension change to AIA.
    2017-03-20_18-11-38.png
  27. Add a new AIA – http://DC01/CertEnroll/<ServerDNSName>_<CaName><CertificateName>.crt and select the following:
    2017-03-20_18-13-59.png
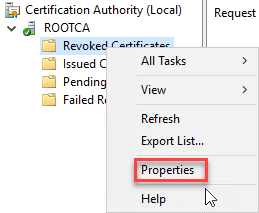
  28. In Certificate Authority right click Revoked Certificates>Properties
    2017-03-20_18-15-13.png
  29. Change CRL interval to 20 years
    2017-03-20_18-16-55.png
  30. In Certificate Authority right click Revoked Certificates>All Tasks>Publish
    2017-03-20_18-18-28.png
  31. Click Next.
    2017-03-20_18-19-48.png
  32. Copy files in C:\Windows\System32\CertSrv\CertEnroll ->  \\DC01\C$\Windows\System32\CertSrv\CertEnroll
  33. Now Jump on DC01 and install Certificate Authority
  34. Under Role Services, select Certificate Authority and Web Enrollment point.
    2017-03-20_18-26-26.png
  35. Install the roles and features.
  36. Under Server Manager click the flag> Configure Active Directory Certificate Services.
    2017-03-20_19-14-56.png
  37. Make sure your using an account with Enterprise Administrator rights and click Next.
  38. Select Certification Authority and Certification Authority Web Enrollment point and click next.
    2017-03-20_19-24-08
  39. Select Enterprise CA and click next.
    2017-03-20_19-25-54
  40. Select Subordinate CA and click next.
    2017-03-20_19-27-06
  41. Select create a new Private Key and click Next.
    2017-03-20_19-28-32
  42. Leave the default cryptography and click next.
    2017-03-20_19-39-40
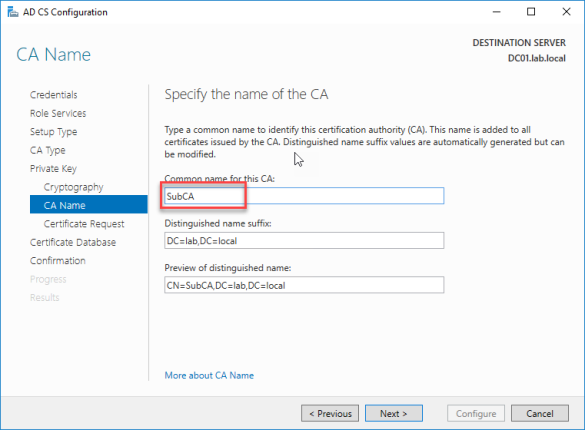
  43. Give the subordinate CA a common name, mines SubCA.
    2017-03-20_19-41-57
  44. Save a certificate request to the local machine.
    2017-03-20_19-44-16
  45. Finish the Installation with the remaining defaults.
    2017-03-20_19-57-39
  46. Copy the certificate back to RootCA
  47. On RootCA open Certificate Authority and right click on RootCA>All Tasks>Submit new request.
    2017-03-20_19-48-04
  48. Browse to the req file.
  49. Select Pending requests and right click on the pending request>All tasks>Issue
    2017-03-20_19-50-07
  50. Select Issued Certificates and open the certificate just issues
  51. Click Copy file
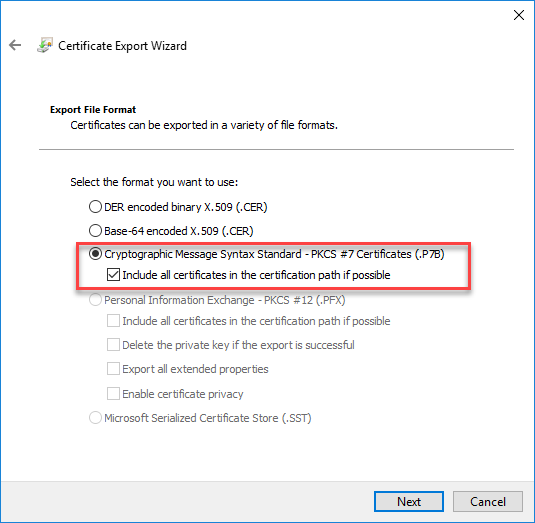
  52. Select Cryptographic Message Syntax Standard and tick Include all certificates in the certification path if possible.
    2017-03-20_19-54-36
  53. Export file to C:\SubCA.p7b
  54. Copy the file back to Dc01
  55. On DC01 Open Certificate Authority>All Tasks Install CA Certificate and browse to the SubCA.p7b
    2017-03-20_20-00-00
  56. Click Ok to the warning.
    2017-03-20_20-01-16
  57. Start the CA service, you should get a green tick as per below.
    2017-03-20_20-02-54
  58. Export Certificates and deploy via Group Policy.